Cubase Chord Progression Builder | Create Your Music With Ease

Jan 8

Welcome to the HTMEM Blog

Have you ever wanted to learn how to write killer Chord Progressions?

Look no further, because I'm about to show you the exact steps and techniques to quickly and easily build professional-sounding chord progressions for any music genre in Cubase.

Today we are going to be showing you an advanced technique on how to use Cubase as a powerful chord progression editor and builder. With Ease.

With this skill, when the inspiration strikes,you'll be able to easily create high-quality tracks and songs that will impress your listeners.

So let's get started!

About Cubase Chord Pads

Cubase's Chord Pads have long served as an invaluable source of inspiration for producers, beatmakers, musicians, and songwriters. With the latest release, these Chord Pads have become even more powerful, making it effortless to discover your next captivating chord progression.

The Chord Progression Generator in Cubase.jpg

Experience the ease of finding your musical muse with the enhanced Chord Pads in Cubase.

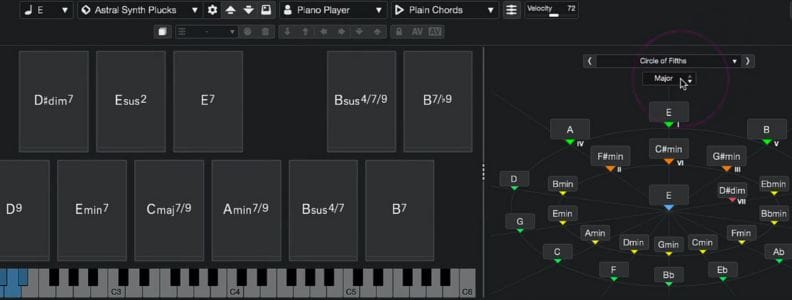
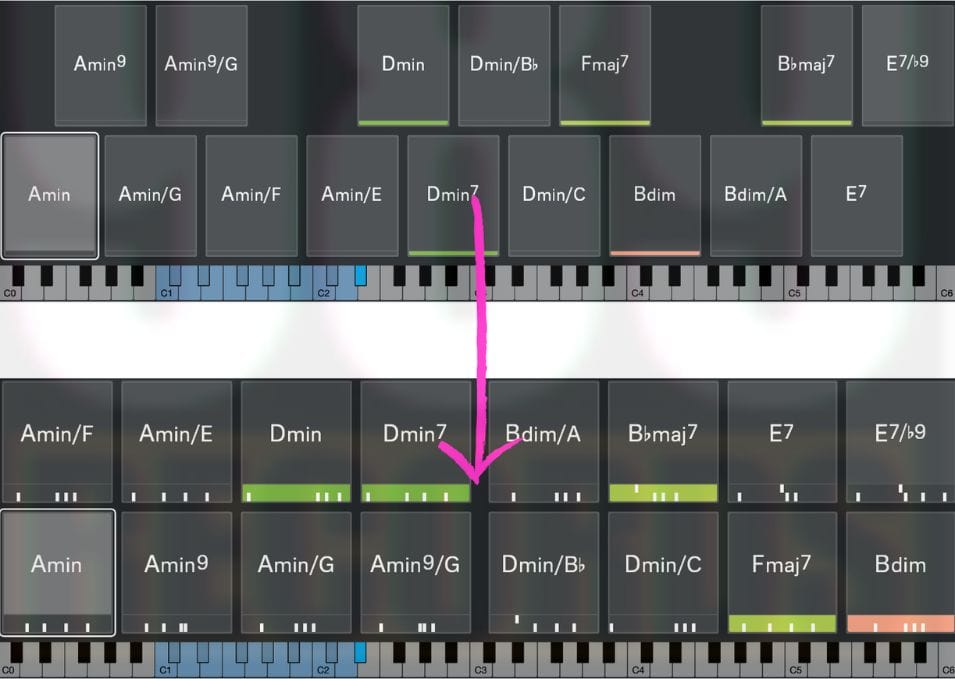
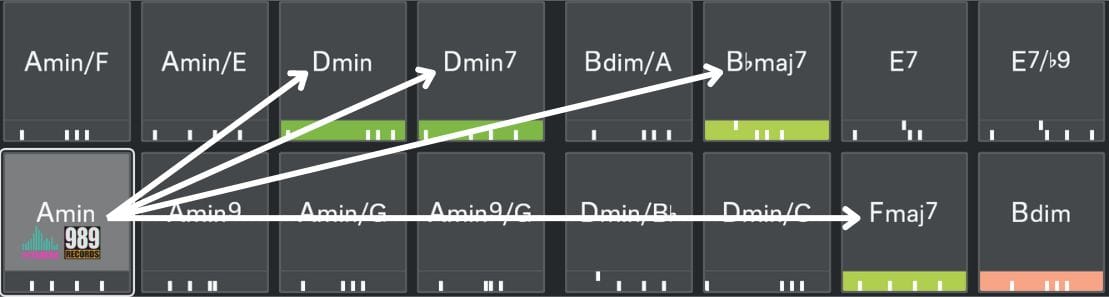
Create Chord Progression

Upon opening the Chord pads in Cubase, you'll immediately notice a redesigned interface. You now have more Chord pads available, and conveniently, the editor is accessible right in the Cubase Lower Zone. Additionally, the circle of fifths, chord editor, and suggested chord list can be found in the right section of the Cubase Lower Zone.

The functionality of the chord pads remains unchanged, allowing you to trigger them using your keyboard or mouse. However, the workflow has been significantly enhanced, resulting in a much faster and more efficient experience.


Discovering your ideal chord progression has never been easier than with the latest version of Steinberg Cubase. Unlock your creativity and explore a world of musical possibilities like never before.

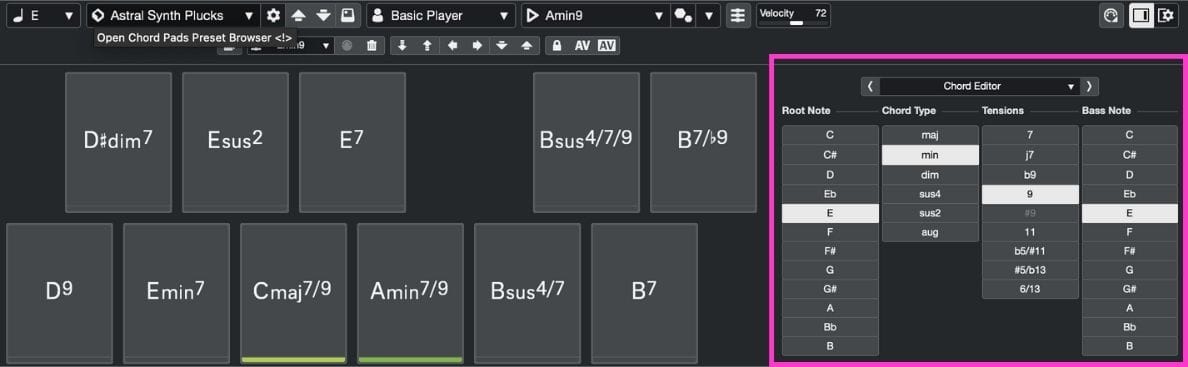
Single or Multiple Chord Editing

If you need to edit your chords, you can easily select single or multiple chord pads at once. Once you've chosen a specific pad, to select multiple pads you can press the Command (MAC) or Control Key (PC) to select additional pads.


Once done, you can perform various actions on the chosen pads. From the tool line, to select all chords at once you can also use the select all functions

Select the first chord or all chords

The new Chord Pad in Cubase is even more music theory aware. For instance, you can easily transpose them, adjust the tension levels, modify the voicing, or even select all the pads by clicking on the designated icon. This allows you to edit all the chord pads simultaneously, saving time and effort.

Chord Generator Presets

To help you begin, there is a wide selection of additional presets available. By accessing the preset drop-down menu, you can explore a variety of pre-made chord progressions.

These can serve as a foundation for your production or be used as they are.

For Example, let's navigate to the preset titled "Arena Chords" and take a moment to listen to some captivating chords.

Moreover, please notice the dynamic updates of the circle of fifths on the right whenever we modify a chord preset.

Write your awesome label here.

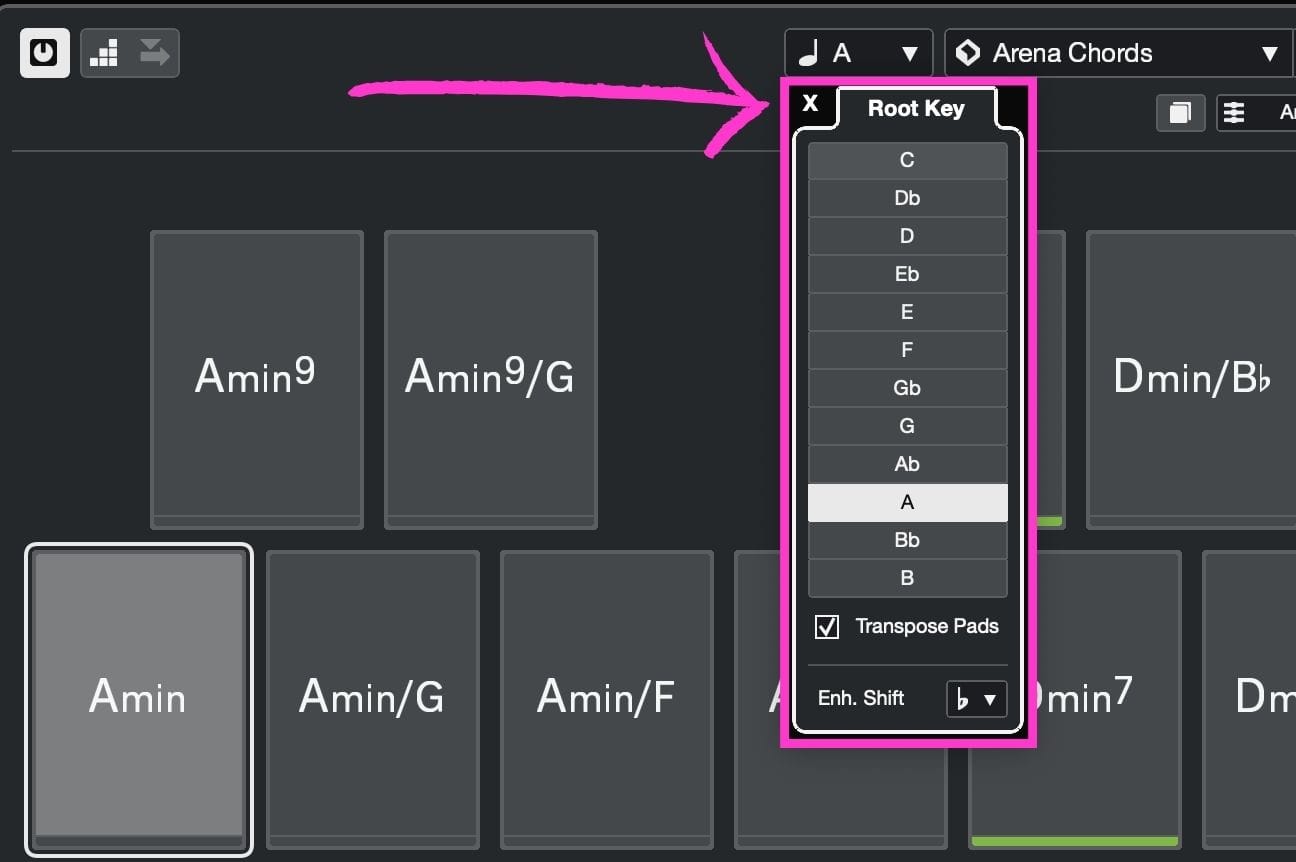
Change Chord Pads Root Key

Now, let's say you like the chord progression above, but you'd like to change the key to match your vocal track.

To do that, you can simply navigate to the toolbar and adjust the root key accordingly. Again, once you make the change, you'll notice that the circle of fifths updates automatically.

Alternatively, if you prefer to add flat or sharp accidentals, you can make those adjustments too.

Furthermore, the Chord pads offer even greater music theory awareness. From the same root key menu, you can select the enharmonic shift option and modify it to your preferences.

With these intuitive features, You can easily customize the chord progression and create harmonies and melodies that suit your musical needs.

And, with these tools at your disposal, why not seize the opportunity to continually expand your music theory knowledge? There's always something new to learn, so dive in and discover the endless possibilities.

Change Chord Progressions Root Key to fit your song ideas

Chord Pads Settings

Now, suppose you desire to modify a chord to something different.

You can navigate to the chord editor located on the right-hand side. From there, you can specify that you want the major chord to be a G major with a major 7th, accompanied by a bass on B.

How to Edit Chord Progression Generator .jpg

Alternatively, you have the option to simply type the name of the particular chord you desire, like B Minor 7. Instantly, the Chord pad will be updated accordingly. And, if you desire, you can of course also switch to minor chords.

Chord Progressions Patterns

Now, when you click on the Player Mode Menu, you'll find three options to choose from: plain chords, patterns, and sections. If you select the pattern menu, you'll discover a variety of patterns available for you to choose from.

Additionally, you have the option to adjust the sound velocity using the MIDI keyboard or stick with the same pattern. For this demonstration, I'll select the Analog Synth Arps preset.

Now, let's listen and play something together.

Write your awesome label here.

Finally, if you have a MIDI part that you'd like to use as a pattern, simply drag and drop chords from it into the pattern menu.

The chord progression pattern will then be played back using the pads, allowing for seamless integration with your music.


Pattern Display Settings: Nashville Vs. Roman Numerals
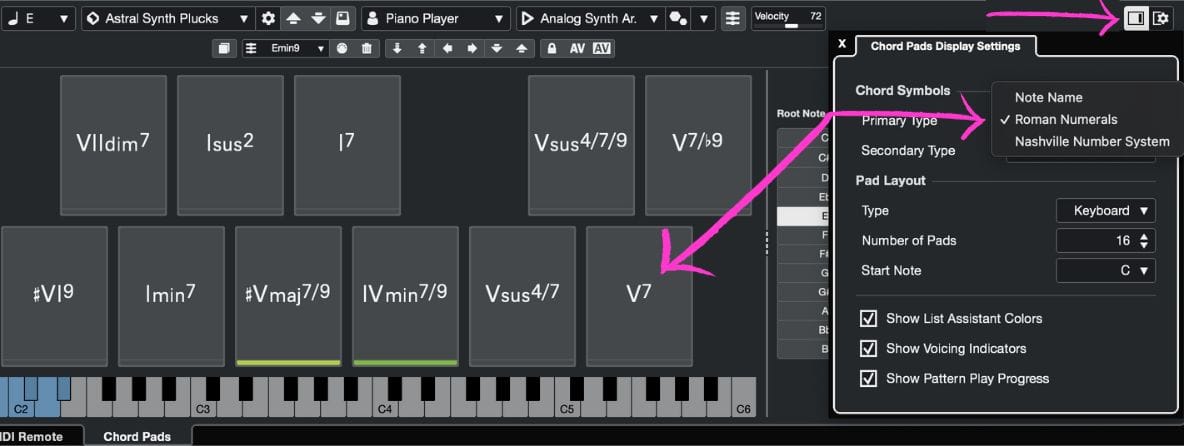
Now, if you navigate to the toolbar on the right-hand side and access the display settings, you will notice the presence of note names, just like before.

However, there is an additional option to display Roman numerals, which represents the degree of the note.

For instance, the first note becomes "I", the fourth note becomes "IV", and so on. 

Alternatively, you can switch to the Nashville number system, which utilizes numbers like "1", "2", and "6" to denote the notes.

Chord progression display with a Roman numeral setting

As you explore these options, you will witness the dynamic transformation of the notation system,

The new Cubase Chord Pad is now more music theory aware than ever before, enhancing its ability to understand and apply musical concepts.

Pad Layout Settings

Another option available is to modify the pad layout, transitioning from the keyboard format to a grid layout. This adjustment can be particularly beneficial if you utilize drum pad controllers to activate your Chord pads.

Chord Progression Generator Pad LayoutSettings
Additionally, you have the flexibility to expand the number of pads to a maximum of 37. Give it a try and enhance your overall experience!

Pad Color: Easy Creative Process

The Pad Color feature offers a visual cue to guide your next move when playing the Chord pads.

The color change indicates the natural progression and flow of the sequence. Greener pads signify a more seamless transition, while pads with different colors introduce a touch of pleasant unpredictability.

Boost your inspiration with the chord progression color code suggestions

By paying attention to the color, you can confidently navigate through the options and be inspired to explore new musical possibilities.

Chord Progression Presets

In addition, you have the option to select a preset for your chord progression. As mentioned earlier, you can easily modify the key to suit your requirements.
elevate your chord progressions work with chord progressions presets in cubase

This allows for greater flexibility and customization in your musical compositions. For your music projects, you have the option to select from a wide range of chord progressions, ranging from common chord progressions to more intricate ones.

Step Input Function

To insert Chord Pads into the Chord Track, we can utilize the step input feature. By enabling the record on the Chord Track and activating step input, a step input cursor will appear in the Cubase Display Window.

Chord progressions Edit with the step input function

We can then begin inputting our chords, using the arrow keys to move the cursor and select the desired placement for each chord.

With this method, we have precise control over our chord progression.

Conclusions

Explore new exciting possibilities with Cubase Chord Pads.

Not only can you have a great time, but you can also gain a deeper understanding of music harmony and chord progressions.

Enjoy the journey and have loads of fun with them! Looking forward to seeing you at the next one.

Discover the Benefits of Learning Cubase at HTMEM!

At HTMEM, we provide a comprehensive Cubase Course that introduces you to the world of electronic music creation using a top-notch DAW.

The best part? You don't even need to buy the software - Steinberg offers a 60-day free trial of Cubase. How convenient is that?

cubase free trial

But wait, there's more!

Our Course Curriculum is meticulously crafted by a Steinberg Certified Trainer, plus lifetime access to the course and exclusive access to our thriving community providing unwavering support at every stage of your learning journey.

Enjoy an extensive collection of 350 free audio samples, and rest assured with our 7-day money-back guarantee.


Suggested Readings: 
go to top Chord Progression Builderfree audio compression course Chord Progression Builder
About the Author

Max Porcelli

Steinberg Certified Trainer, DJ, and Producer with 29 years of experience. He owns 989 Records, an Electronic Music Label based in Italy. Every Saturday he hosts an exciting Radio Show called 989 Records Radio Show on air on Patchouli Deep Radio, London. 
Write your awesome label here.

Bootstrap your Career in Music Production

free samples download Chord Progression Builder
Created with